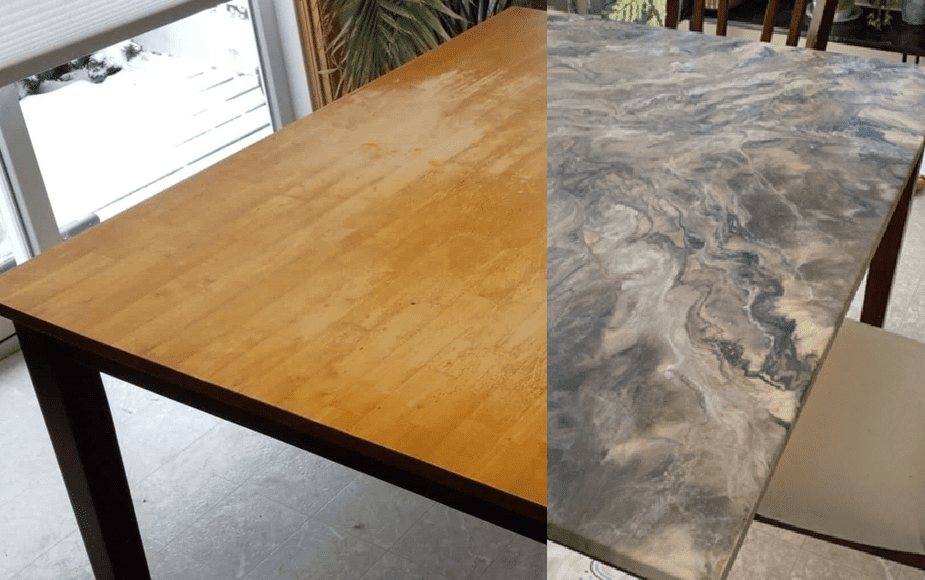
I received this table from a family member, and while it is very functional for my family, with 3 kids, the top was beginning to show a lot of wear and tear from repetitive cleaning. It was around this same time that I discovered Stone Coat Countertop Epoxy (FYI – I am NOT affiliated with Stone Coat, I just think they have an excellent product. It is the only epoxy I use). Using epoxy, epoxy additives, and Rust-oleum spray paint (and a little patience and practice…) I was able to completely resurface my kitchen table.

This is the table before anything was done to it. You can tell where my kids sit cause the finish is rubbed off from all the cleaning, but each spot was definitely showing wear. Before I went out and purchase a new family kitchen table, I decided to give my new epoxy resin hobby a try! Before I did anything to my kitchen table, I made a practice board (shown sitting behind the table) using a spare piece of MDF I had. This way I knew what technique and colors I wanted to use on the actual table.

I started by giving the surface a good thorough clean using whatever kitchen cleaner I had on hand. Once it was dry, I sanded the surface using 220-grit sand paper. This is my old sander, which I actually don’t like very much. I have since upgraded to a Dewalt orbital sander. The type of sander shown in the photo uses little clamps to clamp the sandpaper on. More often than not, the sandpaper would rip, which was very frustrating.

I lined the floor with heavy-duty black trash bags to protect the flooring under the table. Next, I painted the top of the table with Sherwin Williams Kilim Beige. You could use any light color beige, cream, or off-white, this is just the color I had on hand.

I added the epoxy color coat. I used the below color additives to the epoxy:
- Stone Coat Brown Base Tint
- Rust-oleum Cream colored spray paint
- Rust-oleum Black colored spray paint
- Rust-oleum White colored spray paint
- 91% isopropyl alcohol mixed with a couple tablespoons of Stone Coat Copper mica powder additive (used sparingly)

I used a paint stick to add spray paint “veins” and a heat gun to spread the paint. First I sprayed the paint on the paint stick, and then applied it to look like a “vein” that appears in natural stone. The whole process start to finish took a little over an hour. I didn’t prefer the glossy finish that usually accompanies epoxy resin, so I finished the table with the recommended Stone Coat Ultimate Top Coat to the table.
It has been a few years now since I refinished this table, and it is still looking great! This is still my main kitchen table so it gets cleaned very regularly, and the durability of the epoxy has definitely proven itself!

With the table top being a different color, the chair seats would need to be updated so they would still match the table as a set. I bought some faux leather in a cream color, and upholstered the seats of the chairs (see above before and after). I used cotton batting under the “leather” and 1 1/2″ foam padding. I simply stapled the fabric to the underside of the chair.
Please SUBSCRIBE below to be notified when new project posts come out!
Happy DIY’ing!
Disclosure: Twohandsdiy.com participates in the Amazon Services LLC Associates Program, an affiliate advertising program designed to provide a means for publishers to earn fees by linking to Amazon.com and affiliated sites.


How to add picture frame molding - Two Hands DIY
[…] The first thing was to come up with the design I wanted. I knew I wanted to have something in the middle of the wall to break up the space, so I decided I wanted 3 mirrors to be in the center, and then have raised trim to add texture to the wall. The final design I wanted for the wall was a large section in the middle, with two smaller sections on each side, and a chair rail splitting the top and bottom sections. See below for my design and how I figured out the measurements for the wall. The red rectangles are the mirrors. (Also – do you like the table in the video? I designed it myself using epoxy resin. Check out my complete before and after post on that project here). […]