
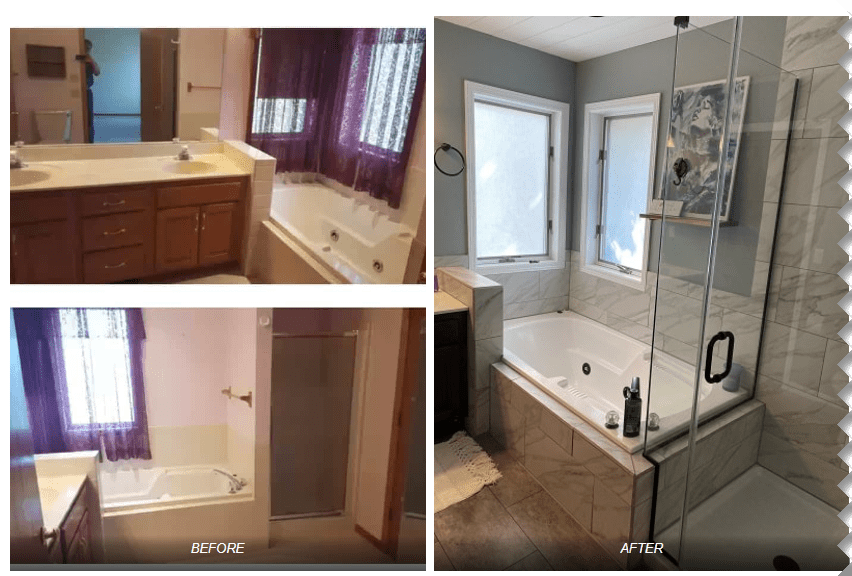
Updating a bathroom can be really easy! If you have a tub and/or vanity top that is functional, but you don’t like the outdated color, you can refinish it, and save $100’s if not $1,000’s!
A quick note before you begin: The refinishing epoxy has a VERY STRONG SMELL. You will need to have a lot of air circulation while painting (and after). I highly recommend opening the windows in the room, and if you don’t have windows, then keep open the windows in the adjoining room and circulate the air with a fan.
Keep in mind, if you live in an area of extreme temperatures like me (Wisconsin), you will want to make sure that you plan your timing so you can keep the windows open for at least 1 day. In order for the epoxy to set/dry correctly, the temperature should be between 50-90ºF (10-32ºC) and the humidity is below 85%.
Materials Needed:
- Rust-Oleum Tub and Tile 2-part Refinishing Kit
- Tape
- Foam paint rollers – Make sure you have plenty. The 2-part refinishing epoxy will eat through the rollers, so you will need to have lots of them to get through at least 2 coats of epoxy paint.
- Or purchase a disposable paint roller kit with extra foam paint rollers
- Comet bathroom cleaner
- Scrub/Scour Pads (you can usually find cheap ones at the Dollar Store)
- Paint Stir Sticks
- Latex Gloves
- 80-100 Grit Sandpaper
- Respirator mask (*highly recommended) – the linked mask is a size SMALL, make sure to get the size that will fit you best.
- paint remover tool
- Bathroom Grade Caulk (and a Caulking gun)
- If you are removing the tub trim – Screwdriver, pliers, and Hex Key Set, plumbers putty
Prep:
Remove all metallic parts from the tub. I highly recommend removing the drain and faucet. There are fancy tools to remove a tub drain, but a needle-nose pliers should do the trick. Before removing the spout – TURN OFF THE WATER FIRST.
(Sorry about the messy tub – my kids used a glittery bath bomb, and glitter is THE WORST!)
After removing the drain and faucet, make sure the area is clean from any debris like plumbers putty. To remove the tub drain, I used a screwdriver and a wrench. To remove the faucet spout, I used a Hex Key Set.


Because my tub is jetted, I also had to remove the trim pieces from around the jets. I couldn’t find the pieces in the oil-rubbed bronze to purchase, so when in doubt, break out the spray paint! First I used Copper spray paint, and then used Oil-Rubbed Bronze, and set with Clear Gloss.
The next step of preparation is to remove all the caulking around the edge of the tub. I find this paint remover tool to be a great way to peel all the caulking away.
Once all the metal and caulk has been removed, Tape any surfaces that you don’t want the paint on. Once dry, the epoxy will not come off.
Keep in mind, if you AREN’T replacing the floors, you will want to tape down thick garbage bags and then tape cardboard/thick paper on top of the trash bags to keep any paint from transferring onto the floor. For my project, I was going to be replacing the floors anyways, so I didn’t bother protecting the floors.
Using rubber or latex gloves, a Respirator mask, Comet bathroom cleaner, and scouring pads, THOROUGHLY clean all surfaces that will be painted.
Again, wear a Respirator mask, and sand/scuff all surfaces using 80-100 grit sand paper. Scuffing the surface will allow the epoxy to bond to surface better. Wearing the respirator mask will help so the particles DON’T bond to your lungs (not fun…) SAFETY FIRST!
Vacuum all the dust away, and wipe down the surfaces again to make sure all dust has been removed. Wait until the surfaces are completely dry! (I’ve seen people even use blow dryers to make sure the surface was totally dry).
Refinish:
I can’t say this enough… WEAR ALL RECOMMENDED PROTECTIVE GEAR: Respirator mask, rubber or latex gloves, old clothing, old shoes (you may have to throw them out after this).
Also, make sure the area is WELL VENTILATED, open windows, turn on exhaust fans, use standing fans, whatever you have to do to keep the air moving. Again, in order for the epoxy to set/dry correctly, the temperature should be between 50-90ºF (10-32ºC) and the humidity is below 85%.
Open both Part A: Activator, and stir with a paint stick for about 30 seconds to 1 minute. Then open Part B: Base, and stir with a paint stick for about 30 seconds to 1 minute.
Pour Part A: Activator into Part B: Base. Stir with a paint stick for at least 1 minute (2 would be better).
Using the foam paint roller, apply paint in thin even layers. Avoid drips as these will set and harden and will stand out in the finish product. If tiny bubbles appear in the paint, it’s ok, these will go away as it sets. DON’T over-roll the paint, I would say no more than 2-3 passes, or it will start to get tacky and start stretching the paint into long cobweb-like strands.
You will want to work at a fast pace, but also take your time and ensure you are covering it evenly. This first coat will not look smooth, you will definitely see the individual rolls.

Wait about 1 hour, and then apply a 2nd coat. Don’t wait more than 3 hours or the epoxy in the can will begin to set, and you won’t be able to use it anymore.

If a 3rd coat is needed (and I would actually recommend it) wait 24 hours, lightly sand with 220-grit sandpaper, vacuum and wipe down to remove all dust, and apply the 3rd coat. (You will likely have to have more than one kit on hand if you need 3 coats)
Final Touches:
After the final coat, wait one hour and remove any tape you used along edges.
Allow 3 days for the epoxy to fully cure before using water on the surface.
Re-install the drain, faucet, and any other metal parts that were removed in the beginning (add new plumbers putty to the drain to ensure it is water tight).
Re-caulk any corners to avoid water leaking.

In true DIY fashion, I got all the way done with refinishing the tub and the tile surrounding it, and decided I still didn’t like the way the tile looked, even though it wasn’t that almond/biscuit/blah color anymore. So I decided to tear out the tile (and the wall behind the tub) and put in a new tile around the shower and tub.

I also decided since the tub turned out so nice, I would refinish the vanity top with the same product!

This would be a great time to install new updated faucets!
Check out my bathroom renovation post for all the updates I made to the bathroom!
Please SUBSCRIBE to get weekly notifications of new posts!
Happy DIY’ing!

Complete DIY Master Bathroom Renovation - Two Hands DIY
[…] Re-glazing the jetted tub and the vanity top […]
Bathroom Renovation: Adding tile to the shower and walls - Two Hands DIY
[…] started by painting the bathtub, tile, and trim to try and brighten the area. While it worked really well, I didn’t care for the tile even […]