
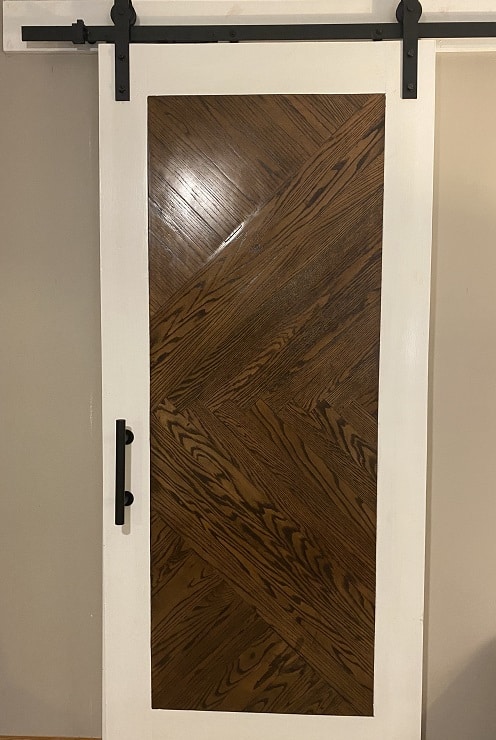


This is a custom barn door I built for the doorway between my Master Bedroom and Master Bathroom. The door is constructed of pine and red oak lumber, with a heavy-duty steel door handle and barn door mounting hardware kit.
I decided to use pine lumber for the outer (white) portion of the door because pine is generally a) lighter, and b) cheaper. It also blended well with the white trim I had. For more information on selecting lumber, check out my post on common lumber types.
I started by removing the old door and hardware. I filled the door frame holes where the hinges and doorknob latch were with wood putty, and sanded it smooth (after waiting 24 hours for the wood putty to dry.)

I joined each corner of the pine lumber using a “rabbit ear” joint. This was accomplished by using my router (similar model) and stripping away 1/2 the width of the wood for each piece so when joined together, they would interlock. The top and sides were 1 x 6, and the bottom was 1 x 8. I made the frame so the outer dimensions were 37″ x 83″. This ensured it would cover my entire doorway and part of the trim when shut.

This was glued and clamped, and allowed to dry overnight. Any gaps or high/low points were “fixed” with wood putty. (I love wood putty, don’t you?) Once the wood putty was dry, I sanded it down to a smooth finish using my orbital sander.

I had a couple pieces of 1/4″ birch plywood to act as my middle piece. One had been used as my staining table in a previous project, but it didn’t matter, you won’t see it once everything is done. Sometimes you gotta use what you have on hand! The frame was glued to this birch plywood and also left to dry overnight.

The lumber I used was red oak. I bought several 8 foot 1 x 3’s.

I started by finding the center of the door. The pattern I wanted would build off the center line.

I dry-fit my first 2 boards (shown above with a red line). These 2 were crucial because they would set the pattern for the rest of the door. I made sure they were at a perfect 90 degree angle. This also allowed me to mark the other ends of the boards precisely where I needed to cut (where the white marks are on the photo). I love this because there is NO measuring, and NO need to find the angle.
Once I had these first two boards cut, I simply taped them in place with painters tape, and continued to build above and below those two boards following the same process: I would lay a board out, mark it so I would know where to cut, cut the board and place it in, securing with tape.
After everything was dry fit in place, I pulled each board INDIVIDUALLY and glued in place. If you take all the boards out at once, you might not get them back in smoothly. It’s best to do it one at a time. I also used a brad-nail gun with 3/4″ brad nails to secure each board to the frame as well as the neighboring boards.

Once everything was glued and nailed, it was time to sand. I sanded using my orbital sander with 80 grit, then 150 grit, and finally 220 grit so there was a flat smooth surface.
Now, the next step is optional, but I like doing it cause it makes for a smoother stain. I treated the red oak lumber with a pre-stain conditioner. A conditioner isn’t actually required on red oak, but it made me feel better after all that work 🙂
Pre-stain conditioner can help the stain application look less blotchy, but is generally used on softer woods. Make sure to follow all product instructions and safety measures.

Next, I stained the red oak lumber with Varathane Kona stain. It’s not pictured but I did tape the edges for a clean edge.

Then, for the pine frame, I painted white using white semi-gloss paint. Side 1 is done!

I purchased a pre-cut frameless mirror from my local hardware store. (Safety First!! Frameless mirrors have SHARP edges, always wear protective gloves like these!) The frame for this side was also made from standard pine. The sides are 1 x 8’s, and the top and bottom piece are 1 x 12’s.
I followed the same process to join (using the bunny ear joint), filled any rough areas or cracks with wood putty, and sanded it. For the mirror, I MADE A MISTAKE YOU CAN LEARN FROM! I glued the mirror to the backside of Side 1. It keeps it in place great with no rattling, BUT it has a very subtle wave when looking in the mirror. I did not intend to make my bathroom a fun house mirror!

An optional add on – I routed the inside lip of the side 2 frame so that when the frame sits ON TOP of the mirror it still sits flat. Again, I think this was more work than it was worth. I think there could have been better ways to secure the mirror. If I had to do it again, I would wait until the whole door was complete, and THEN glue the door, and caulk the edges…. or maybe use clips on the front to hold the mirror in place. I think doing the lip was a bit of overkill.
Finish painting side 2 with white paint.
Add the door handle and barn door mounting hardware kit following the instructions provided with the hardware. I opted to add a white-painted 1 x 6 board as a header to attached the barn door kit to for added strength. This door was HEAVY, but the mounting kit specifications said it could handle it, and so far so good! 🙂
If you have any questions, please reach out at contact@twohandsdiy.com or fill out my Contact Form.
Happy DIY’ing!

Complete DIY Master Bathroom Renovation - Two Hands DIY
[…] DIY Custom Sliding Barn Door Build […]
How to build a classic K-style barn door - Two Hands DIY
[…] building the custom sliding barn door for my master bathroom renovation, a friend of mine asked if I would build a couple barn doors for […]