
Whether it’s painting window frames, wainscotting panels, baseboard trim, or any other type of update involving trim, a cleaner look is achieved if you caulk the seams. But WHY do you need to caulk these seams, and HOW do you do it?
How?
First lets start with some basics of how. When you purchase caulk, first make sure you are purchasing the RIGHT caulk. Caulking can come in different types and colors so make sure you get the right kind. Here are the typical considerations when purchasing caulk. The packaging will describe if the caulk does/does not have these properties:
- Do you need the caulk to be mold/mildew resistant (like in bathroom)?
- Do you need the caulk to be paintable, like on cabinet doors, or wall molding?
- Do you need caulk that is waterproof, like for silicone caulking at the edge of a countertop or sink?
- Are you caulking trim that will be exposed to outdoor elements, or require the caulk to expand/contract with weather conditions?
Once you’ve purchased the correct type and color of caulking you need, you will likely need a caulking gun. See the below video on how to install the caulk tube into the caulking gun.
Now you are ready to caulk! Place the tip of the caulk tube at a 45 degree angle against the area you are caulking. Squeeze the handle to expel some of the caulk, and using a steady pace, apply the caulk to the seam. !!IT’S OK IF IT’S NOT PERFECT WITH THIS FIRST PASS!! Do small sections at a time, 12-24″ to start. Dip your finger or a clean rag in some water and run this along the seam to remove the excess and create a seal on the seam. Repeat this process until all seams are complete.
Why?
But why can’t you just skip this step? Is caulking really necessary? The short answer: No, but you won’t have a clean look, and depending on where this trim is, it could lead to water getting into the seam, or other dirt/debris and end up ruining the trim. This is especially true when painting trim white. If you paint the trim white, the dark un-caulked seam will really stand out.

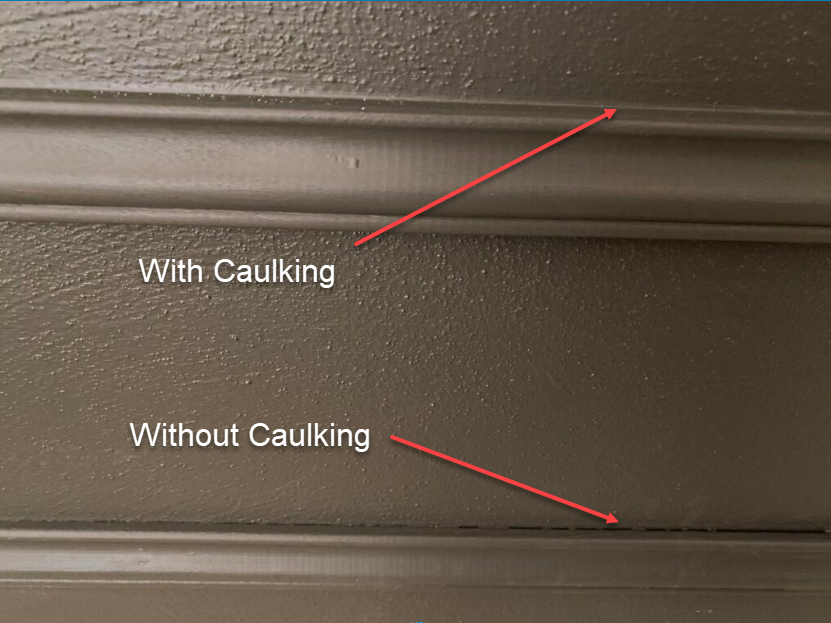
In this photo, you can see where the trim doesn’t meet flush with the wall, and creates a small crack/gap which frankly, just looks sloppy. But the trim piece above that has been caulked and has a nice smooth finish. So at the end of the day, it’s really up to you if you want to caulk trim seams (provided there isn’t a water damage risk), but the look will end up much cleaner, and more professional, if you take the time to caulk.
Please SUBSCRIBE below to be notified when new project posts come out!
Happy DIY’ing!
Disclosure: Twohandsdiy.com participates in the Amazon Services LLC Associates Program, an affiliate advertising program designed to provide a means for publishers to earn fees by linking to Amazon.com and affiliated sites.

How to Build a Custom Sliding Barn Door - Two Hands DIY
[…] I had to do it again, I would wait until the whole door was complete, and THEN glue the door, and caulk the edges…. or maybe use clips on the front to hold the mirror in place. I think doing the lip was a bit of […]