
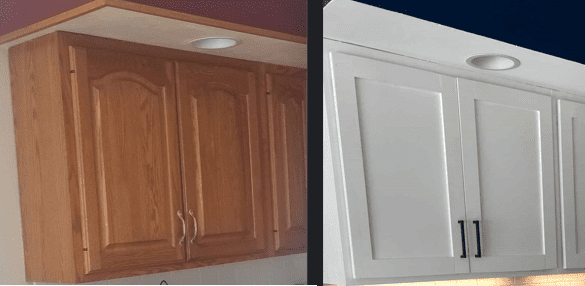
Does your kitchen need a makeover, but it’s not in the budget? I wanted to update my kitchen look, but the functionality was just fine. The cabinet doors were very outdated, and new kitchen cabinets can be a monstrous expense, but are really only necessary if your kitchen layout needs to be changed. Resurfacing cabinet doors can be easy and inexpensive way to update a tired kitchen.
To order just the doors in the custom dimensions I needed, it would have been a pretty big expense also so I decided to make new doors myself.
First, I had to decide if I wanted the doors to be overlay style or inset style.
Overlay style vs. inset style – overlay doors means that the door covers the opening of the cabinet, and the surrounding area. An Inset door means that the door sits inside of the cabinet opening.
For a DIY project, the overlay style is much easier, so that is what I chose. I also really like the shaker style of doors, so that is what I built.
Start by measuring the cabinet opening. Determine if you want to overlay by 1/2″ or 3/4″ (this is important when selecting the hinges later on). For my project, I used 3/4″ soft-close hinges. I love these hinges. They are easy to install, and they have built in tolerance for DIY’ers (more on that later).
To determine the overall door dimensions, I simply added 1 1/2″ to the door opening size. For example, if my cabinet opening was 21″ x 16″, the door for that opening needed to be 22 1/2″ x 17 1/2″. I drew a rough drawing of all my cabinets, numbered them, measured them, and marked the size of the door that opening needed. (My doors are a variety of different widths, and the top and bottom cabinets are different heights, so there are a lot of different dimensions).
I purchased 1 x 3’s poplar boards for the stiles and rails (stiles and rails = horizontal and vertical pieces of the door). I used Poplar wood because I knew I was going to be painting the doors, and Poplar is a nice wood for painting, and it’s also light-weight and easy on my tools when cutting. For the interior piece, I purchased a couple sheets of 4′ x 8′ 1/4″ thick birch plywood.
Next I cut all my stiles and rails to the proper length, according to all my measurements.
I used my router table, and a tongue and groove router bit to cut the “tongue and groove” into the poplar boards. Some people use a dido blade on a table saw for this also, but I don’t own a table saw, so the tongue and groove bit was the way to go for me.

The router bits did a very nice job. I didn’t want the groove to be perfectly center down the board, so there would be a nice inlay once everything was done.

You can see here how a scrap piece of 1/4″ plywood fits perfectly in the groove.

Here is the first rail and stile put together. Not perfect, but not too bad for a DIY first-timer!

Here is a door assembled. You can see along the top how the horizontal board has little “tongues” that fit into the groove of the vertical boards. There is also a groove along the entire interior of the door for the birch plywood to sit inside of. Once all the boards were cut and routed, I assembled them using wood glue and clamps to hold them in place while they dried. I applied wood putty to any areas that had gaps, and sanded it smooth.
I applied Caulk to seal the tiny gap where the birch plywood sits inside the poplar boards. This will give the door a better finished look. Also, it won’t allow crumbs or other debris to get stuck in there when cleaning. At least that was my concern as my kids tend to spill… a lot… Allow the caulk to fully dry before painting.
I used standard white high-gloss paint for the top cabinets, and a light grey for the bottom cabinets. To create a super even finish, I used my paint sprayer. Using this paint sprayer also made the work super quick. I could go apply a coat, wash the nozzle, and leave it to dry within 15 minutes. I’m not exactly sure how many coats I applied, probably 3-4. This paint sprayer is nice because you can detach the paint reservoir and cover it in between coats. Painting each door by hand would have taken a couple hours for each coat. I finished the doors with a couple coats of high gloss polyurethane. (Gloss finish is easier to clean).
Using my Kreg hinge jig, I bored holes for the concealed hinges. This jig was incredibly easy and made for very consistent installation of the hinges. If you are doing this type of project, I would HIGHLY recommend this jig for the hinges.
Next I installed the door handles. I simply measured for the center of the vertical board and that’s where the door handles went. You can also purchase door handle templates if needed.
The best part of refacing cabinet doors is that the cabinet openings already have the holes where the old hinges attached. Simply install the hinges in the same location as the old doors, and voila! you have new doors!
Did I mention that these hinges make installing the doors really simple? Well, they have these little screws on each hinge that allows you to adjust the way the door sits. This gives you a little wiggle room with installing them just right!


Once installed, you can tighten/loosen these screws to give more/less room for the door to swing, or to increase/decrease the gap between the doors. I think this is a genius feature for DIY’ers.
Stay tuned for how I painted the cabinets to match the new doors of my Kitchen Makeover.
Please SUBSCRIBE below to be notified when new project posts come out!
Happy DIY’ing!
Disclosure: Twohandsdiy.com participates in the Amazon Services LLC Associates Program, an affiliate advertising program designed to provide a means for publishers to earn fees by linking to Amazon.com and affiliated sites.
